Magento 2.4.7 Now Available – Time to Upgrade Your Store

Magento 2.4.7 Now Available – Time to Upgrade Your Store

The latest version of the popular e-commerce platform Magento was recently released. Magento 2.4.7 includes several new features, performance optimizations, and bug fixes to provide an even better experience for online merchants and their customers.
What’s New in Magento 2.4.7?

Some of the key highlights of the Magento 2.4.7 release include:

Improved security with stricter Content Security Policy (CSP)

Support for PHP 8.2 for better performance

Compatibility with OpenSearch as an alternative search engine to Elasticsearch

Enhancements to Page Builder content migration tool

Various bug fixes and optimizations for a more stable platform

For a full list of changes, refer to the Magento 2.4.7 release notes.
Benefits of Upgrading to Magento 2.4.7

By upgrading your Magento store to version 2.4.7, you can take advantage of:

The latest security patches to better protect your site from potential vulnerabilities

Improved site speed and performance from PHP 8.2 support and other optimizations

New features like OpenSearch compatibility and Page Builder enhancements

A more stable environment with various bug fixes

Continued support and security updates from Adobe

Getting Help with Your Magento Upgrade from CodeDecorator

Upgrading Magento can be a complex process, especially if you have customized your site. It’s important to carefully plan your upgrade and thoroughly test everything to avoid any issues that could impact your sales.

If you need help upgrading your Magento store to 2.4.7, consider using the professional Magento upgrade services from CodeDecorator. As an experienced Magento development agency, CodeDecorator can handle the entire upgrade process for you, including:

Evaluating your current site and creating a comprehensive upgrade plan

Performing the actual software upgrade to Magento 2.4.7 with expert precision

Conducting thorough testing and quality assurance on your upgraded site

Training your team on any new features and changes in Magento 2.4.7

Providing ongoing support and maintenance to keep your site running smoothly

CodeDecorator’s team of certified Magento developers has a proven track record of delivering successful upgrades for clients. With their expert assistance, you can smoothly upgrade to Magento 2.4.7 and start benefiting from the latest improvements to this leading e-commerce platform.

To learn more about CodeDecorator’s Magento 2.4.7 upgrade services, contact us now.

How to add a new option in Bundle Item?

Magento2 doesn’t provide the option ‘Is Hidden’ which was there in Magneto1. So here we will explain to you how to add the ‘Is Hidden’ option with help of that anyone can create any other option based on their requirement.

First, need to create a plugin to inject your option. For that, we will add the below code in di.xml to add a plugin for Magento\Bundle\Ui\DataProvider\Product\Form\Modifier\Composite.

<type name="Magento\Bundle\Ui\DataProvider\Product\Form\Modifier\Composite">
   <plugin name="cd_add_new_bundle_option" type="Namespace\Extension\Plugin\Bundle\Ui\DataProvider\Product\Form\Modifier\BundleOptions"/>
</type>

Now we will need to add the code below in the file BundleOptions.php which is located at ‘Codedecorator\Learn\Plugin\Bundle\Ui\DataProvider\Product\Form\Modifier to add the option in all existing options for render.

<?php
namespace Codedecorator\Learn\Plugin\Bundle\Ui\DataProvider\Product\Form\Modifier;

use Magento\Ui\Component\Form;
use Magento\Bundle\Model\Product\Type;
use Magento\Bundle\Ui\DataProvider\Product\Form\Modifier\BundlePanel;
use Magento\Catalog\Model\Locator\LocatorInterface;
use Magento\Framework\ObjectManagerInterface;
use Magento\Bundle\Api\ProductOptionRepositoryInterface;
use Magento\Catalog\Api\ProductRepositoryInterface;

class BundleOptions extends \Magento\Bundle\Ui\DataProvider\Product\Form\Modifier\Composite
{
    protected $optionFactory;

    public function __construct(
        LocatorInterface $locator,
        ObjectManagerInterface $objectManager,
        ProductOptionRepositoryInterface $optionsRepository,
        ProductRepositoryInterface $productRepository,
        \Magento\Bundle\Model\OptionFactory $OptionFactory,
        array $modifiers = []
    )
    {
        parent::__construct($locator, $objectManager, $optionsRepository, $productRepository, $modifiers);
        $this->optionFactory = $OptionFactory;
    }

    public function afterModifyMeta(
        \Magento\Bundle\Ui\DataProvider\Product\Form\Modifier\Composite $subject,
        $meta
    )
    {
        $meta["bundle-items"]["children"]["bundle_options"]["children"]["record"]["children"]["product_bundle_container"]["children"]["option_info"]["children"]["is_hidden"] = [
            'arguments' => [
                'data' => [
                    'config' => [
                        'dataType' => Form\Element\DataType\Number::NAME,
                        'formElement' => Form\Element\Checkbox::NAME,
                        'componentType' => Form\Field::NAME,
                        'description' => __('Is Hidden'),
                        'dataScope' => 'is_hidden',
                        'label' => ' ',
                        'valueMap' => [
                            'true' => '1',
                            'false' => '0',
                        ],
                        'sortOrder' => 30,
                    ],
                ],
            ],
        ];

        return $meta;
    }

    /**
     * @param \Magento\Bundle\Ui\DataProvider\Product\Form\Modifier\Composite $subject
     * @param $data
     * @return mixed
     * @throws \Magento\Framework\Exception\InputException
     * @throws \Magento\Framework\Exception\NoSuchEntityException
     */
    public function afterModifyData(
        \Magento\Bundle\Ui\DataProvider\Product\Form\Modifier\Composite $subject,
        $data
    )
    {
        $product = $this->locator->getProduct();
        $modelId = $product->getId();
        $isBundleProduct = $product->getTypeId() === Type::TYPE_CODE;
        $optionfactory = $this->optionFactory->create()->load($modelId, 'parent_id');
        $optionfactorycollection = $optionfactory->getCollection()->getData();

        if ($isBundleProduct && $modelId) {
            foreach ($data[$modelId][BundlePanel::CODE_BUNDLE_OPTIONS][BundlePanel::CODE_BUNDLE_OPTIONS] as $key => $val) {
                $data[$modelId][BundlePanel::CODE_BUNDLE_OPTIONS][BundlePanel::CODE_BUNDLE_OPTIONS][$key]['is_hidden'] = ($optionfactorycollection[$key]['is_hidden']) ? '1' : '0';
            }
        }

        return $data;

    }
}

Now in the last step, we need to create the column in the ‘catalog_product_bundle_option’ table. For this, we can create an InstallSchema file.

$setup->startSetup();
$connection = $setup->getConnection();
$tableName = $setup->getTable(self::TABLE_NAME);

if ($connection->isTableExists($tableName) == true) {
    $columns = [
        'is_hidden' => [
            'type' => \Magento\Framework\DB\Ddl\Table::TYPE_INTEGER,
            'nullable' => false,
            'unsigned' => true,
            'comment' => __('Bundel Item Hidden Status')
        ]
    ];

    foreach ($columns as $name => $definition) {
        $connection->addColumn($tableName, $name, $definition);
    }
}
$setup->endSetup();

That’s all, thanks for your attention. Happy coding 😀

Logging in Magento 2.4+

As we all know that after the release of the Magento 2.4.3 version, the Laminas-log module is removed. Thus, the previous method by using the following will not work

quick ways to debug

    $writer = new \Laminas\Log\Writer\Stream(BP . '/var/log/custom.log');
    $logger = new \Laminas\Log\Logger();
    $logger->addWriter($writer);

So after 2.4.3+

  try {
        $writer = new \Zend_Log_Writer_Stream(BP . '/var/log/custom.log');
    } catch (\Zend_Log_Exception $e) {
        // throw exception
    }
    $logger = new \Zend_Log();
    $logger->addWriter($writer);
    $logger->info('Debuggging on!');

Error: main.CRITICAL: Invalid parameter given. A valid $fileId[tmp_name] is expected in Magento 2

Have you ever faced the above-mentioned issue in your local development area? If yes, then we have a solution for you.

Note: This is the temporary solution we don’t recommend changing the core files.

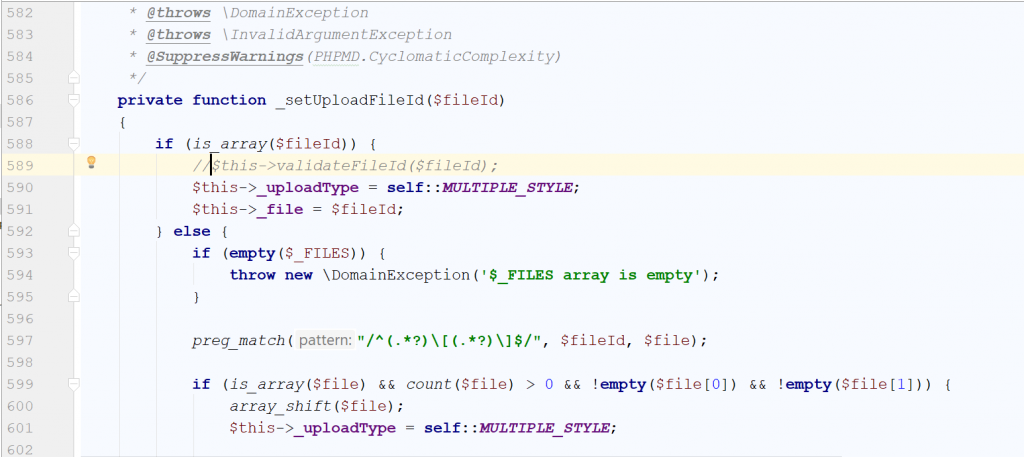
Go to ‘vendor/Magento/Framework/File/Uploader.php’

In function ‘_setUploadField($field)’, comment out ‘$this->validateFileId($field)’ after doing this your function should be simile to following image.

vendor/Magento/Framework/File/Uploader.php

Line numbers in the above screenshot may vary based on your magento version.

Let us know if this solution helped you or not by commenting on our blog

Happy coding 🙂

How to add if condition in transactional emails

Have you ever wonder or faced situation where you want to add condition block in transactional email? If yes, we have solution for you. Please go through all the possible solution.

Solution 1: use depend tag which check whether that variable has some value or not.

{{depend shipping_company}}
  <tr>
    <td>
      <table>
        <tr>
           <td>
               <h1>Your shipment is on its way.</h1>
           </td>
           <td>
             <img src="{{media url=wysiwyg/logo-dpd.png}}" alt="" />
           </td>
         </tr>
        </table>
     </td>
   </tr>
 {{/depend}}

If you have some advance condition using block technique.

Solution 2: Block technique for advance conditioning

{{block class='Magento\\Framework\\View\\Element\\Template' 
               area='frontend' template='Codedecorator_Learn::email/shipping_company.phtml' shipping_company=$shipping_company}}

Add above block code in your email template and create new phtml template in your plugin like following:

<?php 
        if($block->getData('shipping_company') !='dpd') {
                echo $block->getData('shipping_company'); 
        }
?>

I hope above this post help you in your task.

Happy Coding 🙂

How to Add Date Picker in Custom Form

In this post , we are going to see how we can add date picker in custom form at Backend or Frontend.

<div class="admin__field">
      <label for="delivery_date" class="admin__field-label"><?= $block->escapeHtml(__('Shipment Delivery Date')) ?></label>
         <div class="admin__field-control">
           <input name="delivery_date" type="text" class="input-text" id="delivery_date" />
       </div>
 </div>
<script>
    require([
        'jquery',
        'mage/calendar'
    ], function () {
        jQuery('#delivery_date').datepicker({
            dateFormat: 'dd/mm/yy',
            changeMonth: false,
            changeYear: false
        });
    });
</script>

We have to add HTML block and javascript code in same phtml to make date picker work. Let us know if you are facing any issue about the same.

Happy Coding 😀

How to Override comment history order in backend

We have recently worked on backed for one of customer who wants additional information in comment history form so we have override the following layout in order to make it work.

We have override both sales_order_view.xml with order_history block name.

<?xml version="1.0"?>
<page xmlns:xsi="http://www.w3.org/2001/XMLSchema-instance" xsi:noNamespaceSchemaLocation="urn:magento:framework:View/Layout/etc/page_configuration.xsd">
    <body>
        <referenceBlock name="order_history">
            <action method="setTemplate">
                <argument name="template" xsi:type="string">Codedecorator_Learn::order/view/history.phtml</argument>
            </action>
        </referenceBlock>
    </body>
</page>

You can now copy the history.phtml from the core and paste in your module and you can easy customize it or add new fields in your form.

Let’s us know that above code snippets helped your or not. If you have any doubt or any queries. Please do comment in our blog post.

How to add banner on the category sidebar in Magento 2

Have you ever required to add some offers and promotions banner on your website ? I guess answer is ‘Yes’.

Here we have described how can you easily add a banner to the category sidebar even you do not have knowledge of coding because it is really easy to do with Magento 2 admin.

To add a banner in the sidebar follow the below steps.

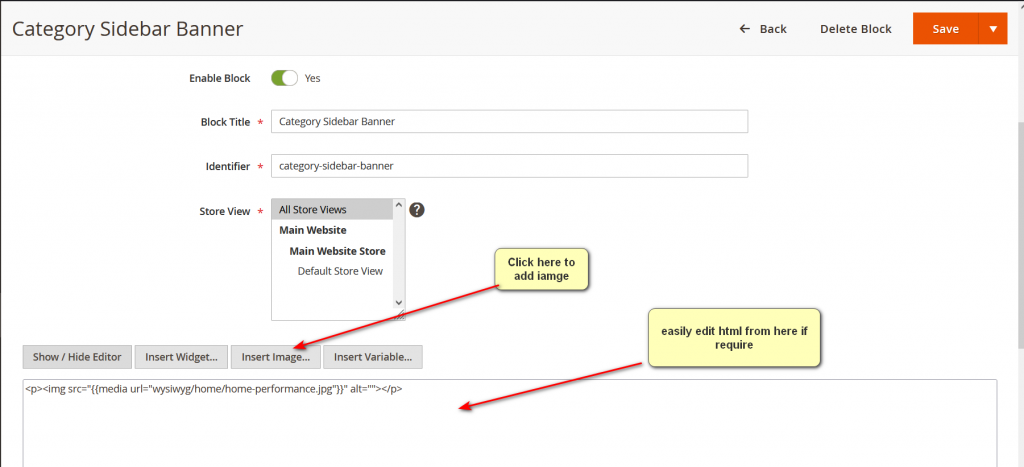
  1. Create Bock

First, you need to create a bock and add a banner image. You can design it with HTML code if you want.

To add Block go to ‘Admin->Content->Blocks->Add New

create block
  1. Create Widget

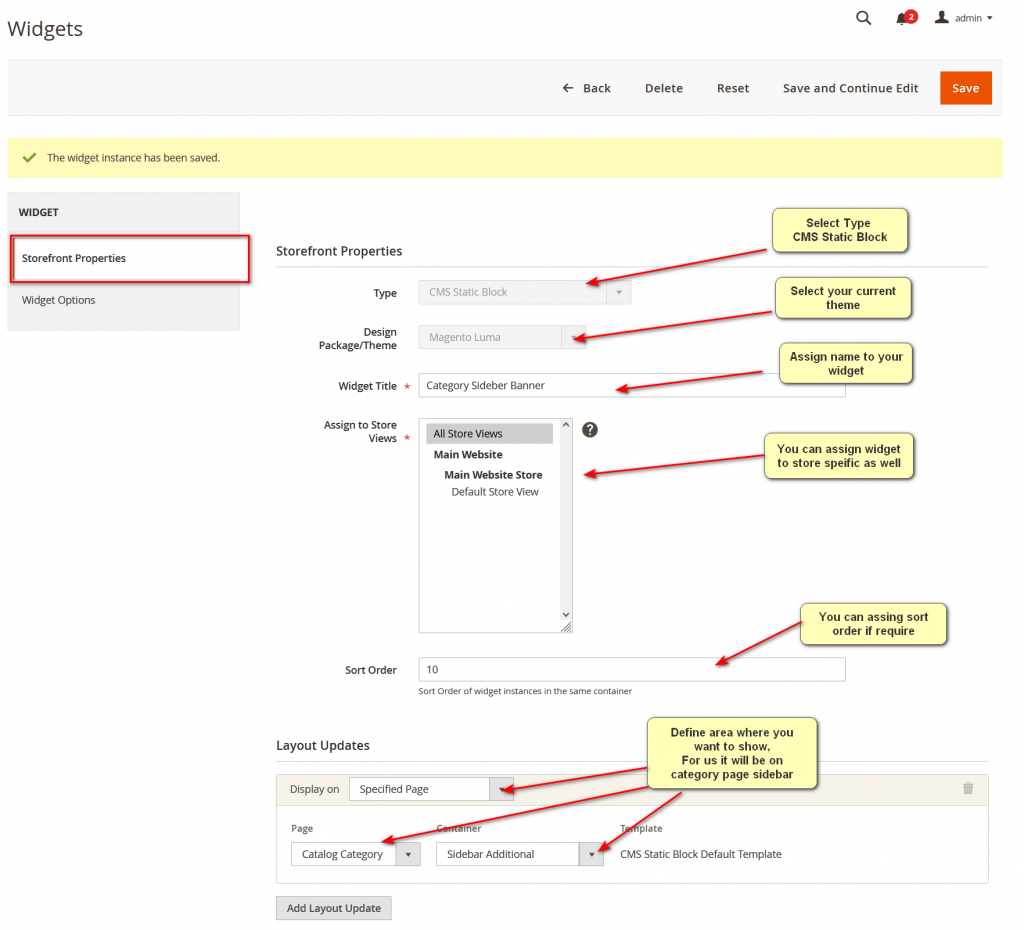
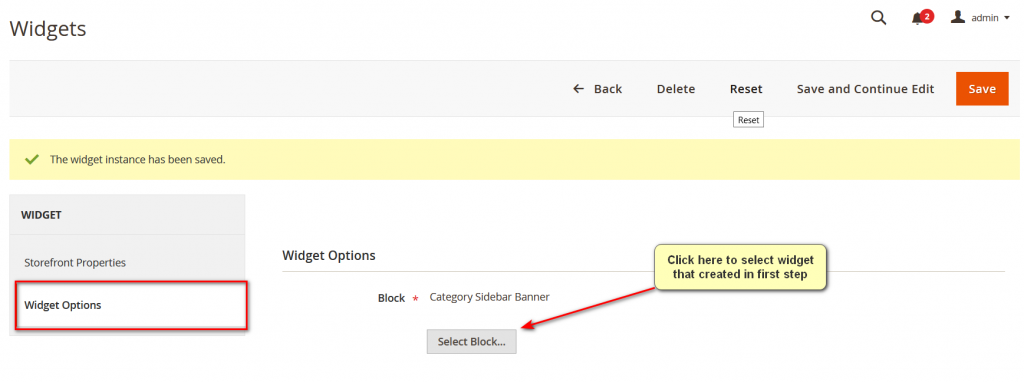
Once you create a block, just go to the widget and add a block to the ‘category page sidebar’.

To add widget go to ‘Admin->Content->Widgets->Add new

Check the below screenshot to know the information to be feeling up in Widget.

Create Widget – 1
Create Widget – 2

  1. Flush Cache

Once you finish all the above steps just go to ‘Admin->System->Cache Management’ and flush the cache.

Happy coding 🙂

MISCONF Redis is configured to save RDB snapshots

Have you ever faced following problem on the server because of the redis?

MISCONF Redis is configured to save RDB snapshots, but is currently not able to persist on disk. Commands that may modify the data set are disabled. Please check Redis logs for details about the error

We recently faced this error on our client’s live site server. Here is the solution for the same:

You will need to login into your server using SSH and hit following commands.

$ redis-cli
> config set stop-writes-on-bgsave-error no

I hope these command solve your problem and let us know if you have other solution which worked for you.

Happy coding guys!

How to change price dynamically on product page in Magento2

In this blog post, we are going to code how to dynamically change the price on product page for magento 2.

To add JS code on the product page, we have created layout file and added js file in content reference container.

<page layout="1column" xmlns:xsi="http://www.w3.org/2001/XMLSchema-instance" xsi:noNamespaceSchemaLocation="urn:magento:framework:View/Layout/etc/page_configuration.xsd">
    <referenceContainer name="content">
        <block class="Magento\Framework\View\Element\Template"
               name="pricechange" as="pricechange" template="Codedecorator_Learn::product/js.phtml"/>
    </referenceContainer>
</page>

After creating layout file, lets create template file which will have our js code

require(["jquery","Magento_Catalog/js/price-utils"], function(jQuery,priceUtils) {
    var productPrice = parseFloat(jQuery('span.price-final_price > span[data-price-type="finalPrice"]').attr('data-price-amount'));
    var finalPrice=100;
    formatedPrice = priceUtils.formatPrice(parseInt(finalPrice));
    jQuery('span.price-final_price > span.price-wrapper > span.price').text(formatedPrice);
    var finalPrice=productPrice+(pricePerText*textObjects)+(pricePerImage*imageObjects);
    formatedPrice = priceUtils.formatPrice(parseInt(finalPrice));
    jQuery('span.price-final_price > span.price-wrapper > span.price').text(formatedPrice);
}); // Required

After creating both the files, just flush the cache using following command.

php bin/magento cache:flush

I hope this post will help and give the solution for any of your problem.

happy coding 😀